Fitting Instructions for Gland Packing
General
When fitting packing, it is important to remember the following.
1. Remove all old packing, clean gland space and check shaft for lateral movement; packing will not act as a bearing and shaft movement will quickly destroy packing. Replace shaft bearings if worn.
2. Measure shaft and housing diameters and make sure new packing is of correct size.
3. Cut rings to correct length, preferably by cutting through packing wrapped round mandrel equal to shaft diameter, or round shaft itself if sufficiently accessible. For plaited packing rings should be cut square to give a butt join. Vulcanised packing should be square cut leaving a gap of approximately 3mm to 6.5mm, according to section to allow for expansion. If rings are not cut round a mandrel, remember that O.D. circumference is greater than I.D. circumference so that a slight angle is required when cutting to avoid gaping at outer edge of ring. Extruded and moulded hydraulic packing should be scarf cut at 45°C to the axis of the shaft.
4. Fit rings individually and twist to fit over shaft; never open out rings as this can distort packing. Carefully tamp each ring into gland before adding further rings and ensure that joins on successive rings are staggered, preferably at 90°.
If a lantern ring is fitted ensure that channel is in line with lubricant feed and allow for movement during take-up of packing.
Packing Problems
Packing may fail for a variety of reasons but invariably if the correct packing has been selected, the failure will be due to improper installation, unfavourable service conditions or faulty equipment. I.E. - Shaft misalignment, poor condition of shaft, bearing misalignment, uneven take-up on the gland bolts or other mechanical causes. The reason for packing failure can often be found by visual observation of the removed packing. The following table lists problems and gives possibly reasons why these have occurred. Adjustment
Pumps
After fitting all rings in pump glands, tighten gland nuts finger-tight or with only very slight bolt load. Start up pump and then tighten gland nuts evenly until leakage is reduced to an acceptable level. Never try to stop leakage completely, particularly when fitting new packing, otherwise excessive heat will develop hat will reduce packing life and increase shaft wear. When following-up a gland in service always tighten all nuts and equal amount and allow 10 to 15 minutes for packing to settle after each adjustment before making a further adjustment.
Valves
When packing valves, rings should be compressed by tightening gland nuts evenly until there is heavy resistance to further tightening. During this operation turn valve steam slightly to ensure that gland is not overtightened so as to prevent valve movement . Gland nuts should be followed-up after 24 hours, even if no leakage occurs to compensate for the natural settling of the packing.
Synthetic Fibre Packing
When fitting synthetic fibre packing in addition to the normal fitting precautions for regular packing it is necessary to cut the rings slightly overlength and to wrap the ends with tape to prevent fraying during cutting and handling. It is also very important not to stretch the packing before cutting because with the plaiting construction and memory of many man-made fibres the cut length will shrink before fitting or in service. Packing rings must be cut to length using a very sharp knife (hollow ground if possible) and to prevent fraying, the packing can be wrapped with PTFE threadseal tape (this can be left on with advantage for fitting). Packing rings must be square cut 4-5% longer than the calculated length. An ideal method is to cut packing round a wooden mandrel which is larger (by the required amount) than the shaft diameter. If this is not possible it is important to remember that the O.D. circumference is greater than the I.D. circumference, so a slight angel is required when cutting to avoid gaping at the outer edge of the ring.
Troubleshooting
Gland Overheating:
Excessive load applied to gland follower which allowed no leakage when the pump was running
Inside Diameter of Packing Very Dry and Charred:
Excessive load on gland follower, no leakage when pump was running
Glazed or worn appearance on side of removed packing rings:
Packing rings too loose and rotating with shaft
Rings adjacent to gland follower badly distorted or deformed:
Each turn of packing not located and pressed home individually
Excessive leakage from gland and packing in good condition:
Joints not staggered
Removed packing rings shown in axial bulge:
Probably excessive gap on the adjacent ring. Rings cut too short
Rings out of proportion ie : Very Thin:
Packing used probably undersize section
Packing rings heavily worn at one point on the inside circumference:
Shaft or rod not central in the stuffing box bore
Rings extrude at the gland follower:
Excessive clearance between the O.D. of shaft I.D. or follower
Removed packing is torn or grooved:
Shaft is worn or presence of abrasive material in media being pumped
Packing rings excessively deformed on opposite sides of the shaft:
Check for worn bearingsEvidence of wear on the outside of packing rings:
Rings rotating with shaft or loose in the box. ie - Packing used may be undersideInside packing rings attacked or deteriorated:
Packing may be incompatible with fluid being handledRemoved packing rings dry and/or charred:
Media being handled is washing out lubricant or temp. is too high for packing being usedIrregular widths or removed packing rings:
Packing is probably acting as a bearing and supporting the shaft weight
1
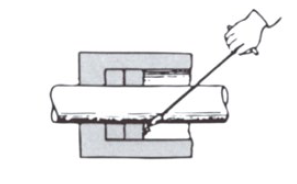
Remove all of the old packing. Aim the packing hook at the bore of the box to prevent scratching the shaft. Clean the box thoroughly so that the new packing wont hang up.
2
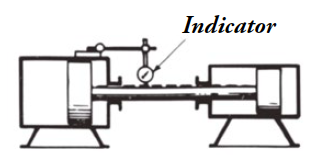
Check to see if the rod grooves or shoulders are bent. If the neck bushing clearance in bottom of box is too large use a stiffer bottom ring or replace the neck bushing.
3
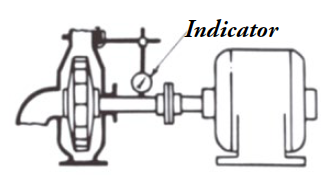
Revolve the rotary shaft. If the indicator runs out at over 0.003-in" straighten the shaft. Check the bearings or balance rotor.
The Gyrating shaft will beat out the packing.
4
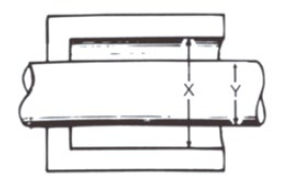
To find the right size of packing to install measure the stuffing-box bore and subtract the rod diameter. Then divide by 2.
Packing is too critical for guesswork.
5
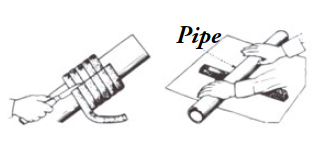
Wind the packing needed for filling the stuffing box snugly around the rod (for the same size shaft held in vice) and cut through each turn while coiled as shown. If the packing is slightly too large never flatten with a hammer. Place each turn onto clean newspaper and then roll out with a pipe as you would with a rolling pin.
6
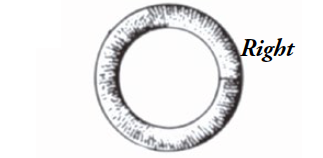
Cutting off rings while the packing is wrapped around the shaft will give you rings with parallel ends.
This is very important if the packing is to do its job.
7
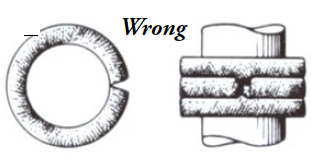
If you cut the packing while it’s stretched out straight, the ends will be at an angle, with a gap. This squeezes the top of the gap and the ring can’t close. Most packings need no expansion room. But Channel-type packing with a lead core may require room for expansion.
8
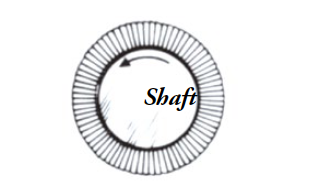
Install foil-wrapped packing so that the edges on the inside will face the direction of the shaft rotation.
If this isn’t carried out the thin edges will flake off thus reducing the life of the packing.
9
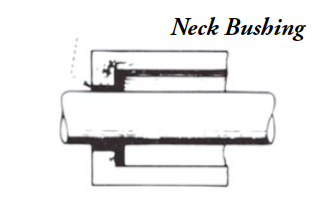
The Neck bushing slides into the stuffing box. A quick way to fit it is to pour soft bearing metal into a tin can. Then turn and bore it to fit into place.
10
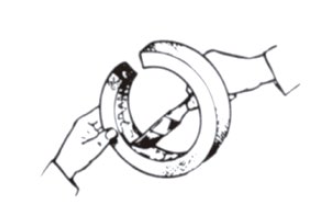
Swabbing the new metallic packing with a lubricant supplied by the packing manufacturer is ok.However if the rod is oily don’t do this
11
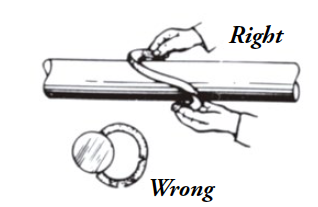
Open the ring joint sideways (especially lead-filled and metallic types) This prevents distortion of the moulded circumference and breaking the ring opposite the gap.
12
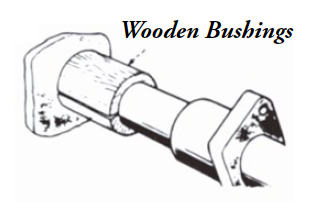
Use split wooden bushing. Install the first turn of the packing, then force it into the bottom of the box by tightening the gland against the bushing. Seat each turn this way.
13
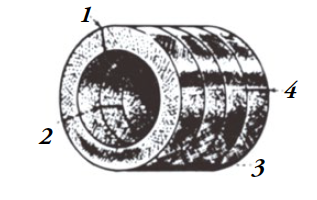
Stagger joints 180° if only two rings are in the stuffing box. Space them at 120° for three rings and at 90° if four or more rings are in the set.
14
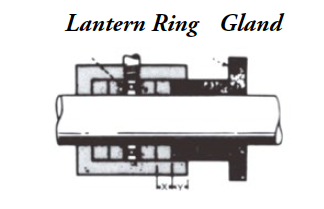
Install packing so that the lantern ring lines up with the cooling-liquid opening. Also remember that this rung moves back into the box as the packing is compressed. Leave space for the gland to enter as shown. Tighten the gland with a wrench and back off finger-tight.
Allow the packing to leak until it seats itself. Then allow slight operating leakage.
15
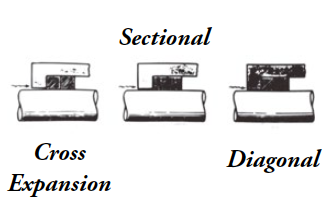
Always install cross-expansion packing so that the plies slope toward the fluid pressure from housing.
Place sectional rings so that the slope between the inside and outside ring is toward the pressure. Diagonal rings must also have slope toward the fluid pressure. Watch these details for best results when installing new packing in a box.
16
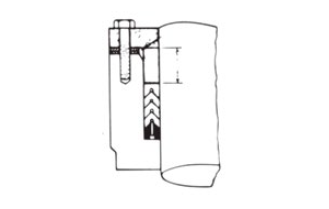
First clean the stuffing box, examine ram or rod. Next measure the stuffing box depth and packing set, find the difference. Place ⅛" washers over gland studs as shown. Lubricate ram and packing set (if for water).
Place male adaptor in bottom then slide each packing turn home. Stagger joints for cut rings, measure from top of packing to top of washers, then compare with gland. Never tighten down new packing set until all air has a chance to work out. As packing wears remove one set of washers, after more wear remove washer.


